
Setup 7 of 14
Generate a Webflow site token for the CMS and connect
If your site runs on Webflow, Get1pct can apply the edits you choose with “Use this edit” to the title, description and heading fields of CMS item pages, such as blog posts. To connect, you create a site token that works only for that site, with CMS set to read and write and Sites set to read-only.
- Required?
- Optional (Webflow only)
- Where you do it
- Webflow site settings
Before you start
- You need site administrator access, because only administrators can create site tokens.
- The site must be published on a custom domain, and the domain you registered in Get1pct must be one of the site’s custom domains. A site that is only on webflow.io can’t connect.
- Get1pct changes only pages generated from CMS collections (for example, /blog/item-slug). Changing the SEO settings of a static page requires publishing the whole site, so you copy those edits and apply them yourself.
- Connecting is optional. Without it, you copy the wording of each edit and paste it into Webflow yourself.
- Each site can have one connection. If WordPress is connected to the same site, connecting Webflow replaces it.
- This page has no Webflow screenshots because we don’t have a test site. The steps follow Webflow’s official documentation.
Scopes to grant
When you create a site token, you choose No access, Read-only or Read and write for each API. Choose these:
- CMS: Read and write (
cms:read,cms:write). Get1pct reads your collections and live items, and changes the fields you list. - Sites: Read-only (
sites:read). When you connect, Get1pct checks that the site’s domain matches the site you registered. - No access for everything else. Get1pct doesn’t need Pages, Forms, Assets, Custom code, Ecommerce, Users or the others, and it doesn’t need write access to Sites.
To learn how to store the token and what to do if it may have leaked, see Keep API keys and CMS tokens safe.
Steps
Step 1Generate a site token
- In the Webflow dashboard, click the gear icon (Site settings) of the site you want to connect.
- Open Apps & integrations. Under API access, click Generate API token.
- Enter a name such as get1pct, choose the access described above and click Generate token.
- Copy the token. Webflow shows it only on this screen.
A site can have up to 5 site tokens. A token that isn’t used for 365 days in a row stops working.
Step 2Note the site ID and collection IDs
- Site ID: a 24-character ID on the General (overview) page of Site settings.
- Collection ID: open the collection’s settings (Collection settings) from the CMS panel in the Designer. The ID is near the top.
- Field slugs: each field’s settings show its API name, such as name or seo-title. You enter these as the field IDs in the dashboard.
Get1pct can change only Plain text fields. If you list a rich text field or another type, connecting fails.
The name field is the item’s name. It also appears in collection lists, references and navigation, so an edit to it changes those places too. The dashboard reminds you of this when you connect.
Step 3Enter them in the dashboard and click Connect
Open Connections in your dashboard. Under “How your site is updated”, choose “Shopify, Webflow, Contentful, microCMS or another service”. The dashboard in the screenshot is in Japanese, so each step below it gives the English label in brackets.
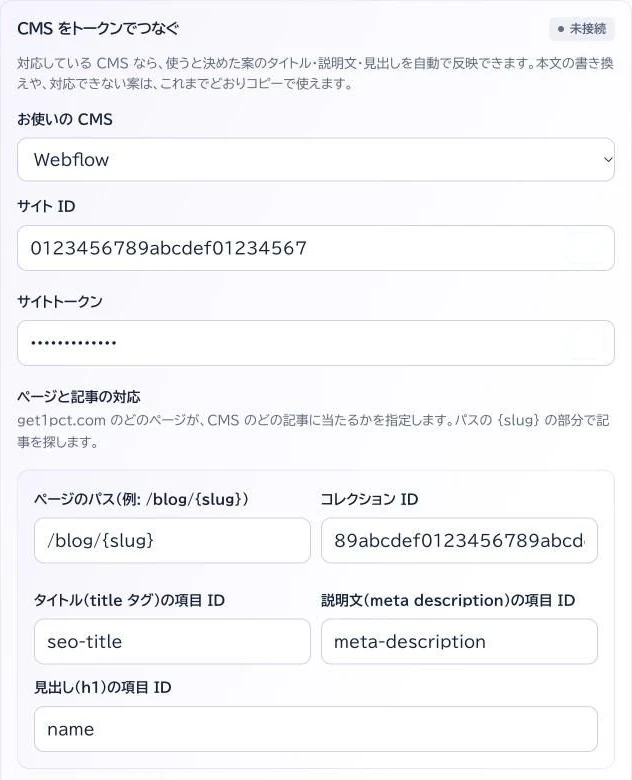
- Choose “Webflow” in “お使いの CMS” (Your CMS).
- Enter the site ID in “サイト ID” (Site ID).
- Paste the token into “サイトトークン” (Site token).
- Enter the collection page path, such as /blog/{slug}, in “ページのパス” (Page path), and the collection ID in “コレクション ID” (Collection ID). {slug} is the item slug.
- Enter the slugs of the fields we may change, such as name or seo-title. Only plain text fields can be changed.
To connect more collections, add rows with “Add a mapping”. Then click “Connect” at the bottom.
How this connection behaves
Get1pct follows these rules every time it applies an edit through this connection.
- We only change the title tag, meta description and heading (h1), and only in the fields you listed when connecting. We never change body text.
- We change a field only when its current value is exactly the same as the edit’s “before” text (the text on the live page). If it differs at all, it’s a different entry or your site adds words (such as “| Site name”), so we leave it for you to copy.
- We don’t write an edit whose new text is the same as before, longer than 2,000 characters, or contains < > [ ] or control characters (a CMS may read them as tags or shortcodes).
- Before writing we record which field changes from what to what, and after writing we read it back. If the saved value differs, we put the old value back and report a failure.
- If a write is interrupted, we read the current value next time: if it was written we’re done, if it’s unchanged we continue, otherwise we report a failure. We never write the same change twice.
- Undo puts the old value back only while the field still holds the value Get1pct wrote. If someone has edited it since, we leave it.
- We only call the CMS’s official API host. We don’t follow redirects, give up after 15 seconds and don’t read responses over 2 MB.
- Get1pct writes only to editable Plain text fields. It leaves draft items, archived items and items with unpublished changes alone. If another field of the item disappears after writing, Get1pct puts back the missing fields and the field it wrote. It doesn’t touch fields that someone else changed at the same time.
- Get1pct writes only in the primary locale. Edits for pages in locales added with Webflow Localization (such as /fr/…) are left for you to copy.
To compare Shopify, Webflow, Contentful and microCMS side by side, see what each CMS connection can do.
Check the connection
Once connected, use “Check the connection” under the CMS in Connections. Enter the URL of one live article or item page.
- Read test: we find the CMS entry and show, for the title, description and heading, whether the CMS value is exactly the text on the live page. Only those fields are updated automatically; for the others the table shows why. Nothing is changed.
- Write test: we write the current value of one field that can be updated back into it as is, and read it back. The live page doesn’t change. If the token can’t write, or your CMS changes the text when saving, the result says so.
Run the read test first, then the write test. If the write test says the next edit can’t be applied, publish the site (or entry) in your CMS and let us know.
After connecting
- Get1pct writes an edit you choose to the live item only when the field’s current value exactly matches the text on the live page. The change appears on that item’s page right away, without republishing the whole site. To reverse it, click “Undo the change” on that edit in the dashboard.
- Get1pct leaves draft items and items with unpublished changes alone, so it never publishes someone else’s work in progress. It does the same when that one field has different text in the item’s unpublished version. You copy those edits and apply them yourself.
- After writing, Get1pct reads the item again. If another field went missing, it puts that field back.
Troubleshooting
- “We could not connect.”
- Check that the site ID and the token belong to the same site, and that the token has CMS Read and write and Sites Read-only. Check that the domain you registered is one of the site’s custom domains (a site only on webflow.io can’t connect). Check the collection IDs, and that the fields you listed are Plain text. A mapping for a page path under a secondary locale folder (such as /fr/…) also makes connecting fail.
- An edit isn’t applied automatically
- To be safe, Get1pct leaves an item alone when it has unpublished changes or its value differs from the live page. Publish your changes in Webflow and try again.
- Edits for static pages aren’t applied
- Get1pct doesn’t support the SEO settings of static pages. Copy the edit into the page settings in Webflow and publish the site.
To stop
Click “Disconnect” under Connections in your dashboard. Get1pct deletes the token it stored. The token still exists in Webflow, so also click Revoke next to it under Site settings → Apps & integrations → API access. It stops working immediately.
Guides for other CMSs: Shopify, Contentful and microCMS.
If the steps don’t match what you see, contact us with your site URL and the screen where you got stuck. Please don’t send passwords.