
Setup 9 of 14
Create a microCMS API key with GET and PATCH and connect
If your site is built with microCMS, Get1pct can write the title, description and heading edits you choose with “Use this edit” straight to your microCMS content. To connect, you create an API key just for Get1pct that allows only GET (read) and PATCH (update some fields) on the APIs you connect.
- Required?
- Optional (microCMS only)
- Where you do it
- Your microCMS admin
Before you start
- You need a microCMS member who can create API keys, such as an owner or administrator.
- Know how the URLs of your public pages are built, for example /blog/content-id.
- Connecting is optional. Without it, you copy the wording of each edit and paste it into microCMS yourself.
- Get1pct stores the API key encrypted and uses it only to apply and undo the edits you choose. It deletes the key when you disconnect or cancel.
- Each site can have one connection. If WordPress is connected to the same site, connecting microCMS replaces it.
Permissions to grant
Get1pct does only two things in microCMS:
- GET: it finds the content behind a public page and reads the current value of its fields. It reads published content only, never drafts.
- PATCH: it changes only the field of the edit you chose (the title, description or heading field you listed).
So clear GET under “Default Permission”, and give GET and PATCH only to the APIs you connect under “Custom Permission for Selected API”. GET under Default Permission is checked from the start and applies to every API in the service, so don’t leave it on. Get1pct doesn’t need POST, PUT, DELETE, getting all draft or closed contents, or any Management API permission.
If your plan doesn’t offer custom permissions, give GET and PATCH under Default Permission instead. The key can then read and update every API in the service, but Get1pct only changes the endpoints and fields you list in the dashboard.
To learn how to store the key and what to do if it may have leaked, see Keep API keys and CMS tokens safe.
Steps with screenshots
Step 1Note your service ID and open the API keys
Log in to microCMS and open the service you want to connect.
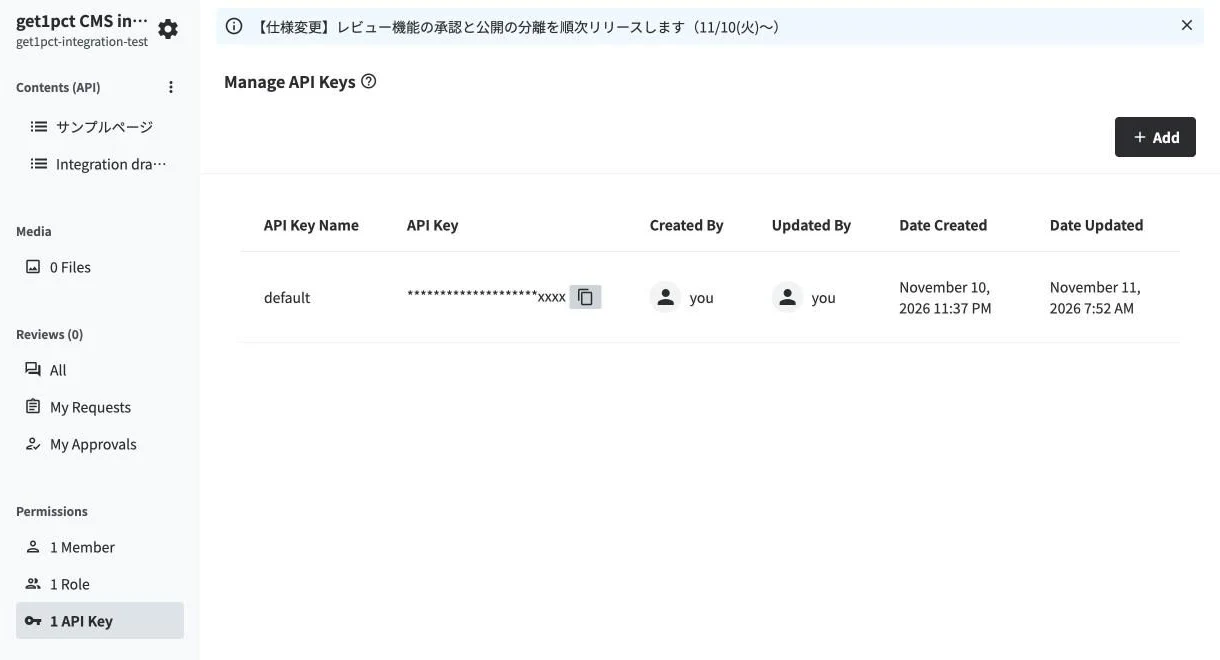
- The service ID is shown under the service name at the top left (the xxx in xxx.microcms.io). Note it down.
- Click “1 API Key” in the left menu.
- Click “Add” at the top right.
Step 2Create a key with only GET and PATCH
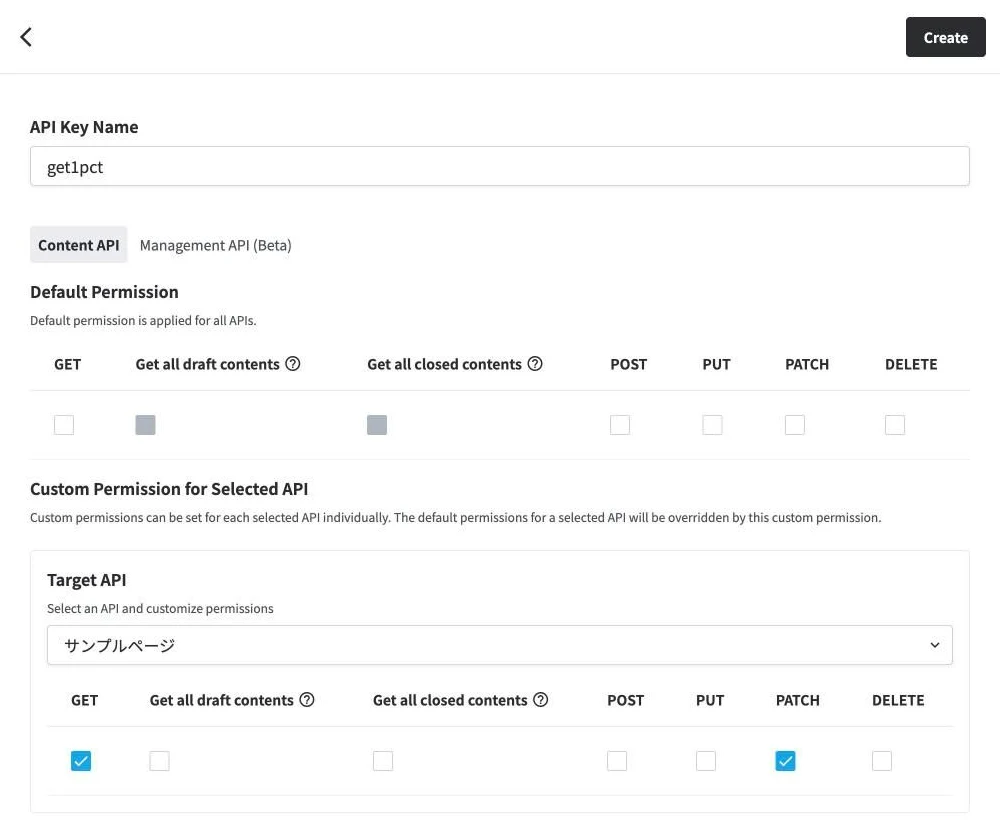
- Enter a name you will recognize, such as get1pct, in “API Key Name”.
- Clear GET under “Default Permission”. It is checked from the start and applies to every API in the service.
- Click “Set custom permissions for selected API” and choose the API to connect in “Target API”.
- Check “GET” for that API.
- Check “PATCH”. Leave everything else (Get all draft contents, Get all closed contents, POST, PUT, DELETE) unchecked. Repeat 3 to 5 for each API you connect.
- Click “Create” at the top right.
Set this on the “Content API” tab. Leave the “Management API” tab empty.
Step 3Copy the key
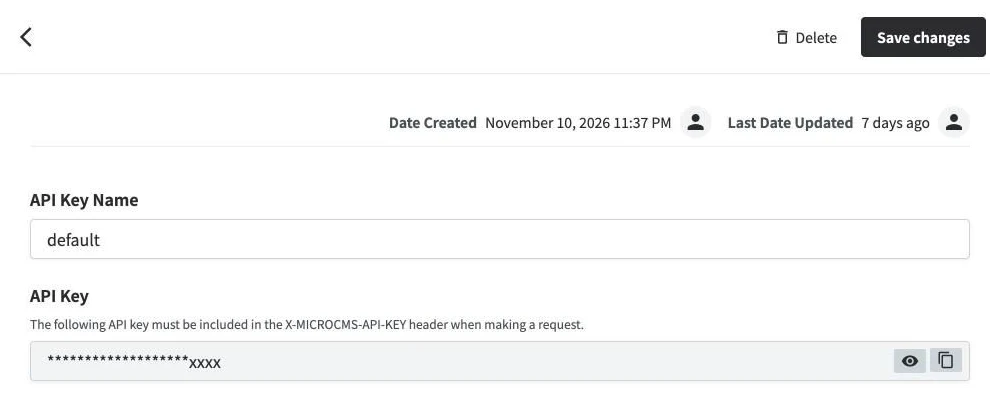
- Open the key you created and copy it with the button to the right of the “API Key” field.
Step 4Note the endpoint
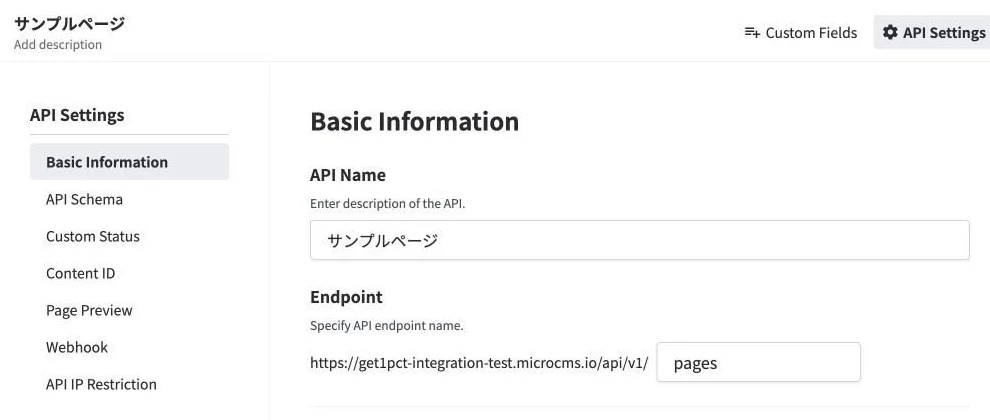
- Open the list of contents and click “API Settings” at the top right.
- Note the value in “Endpoint” (pages in this example).
Step 5Note the IDs of the fields we may change
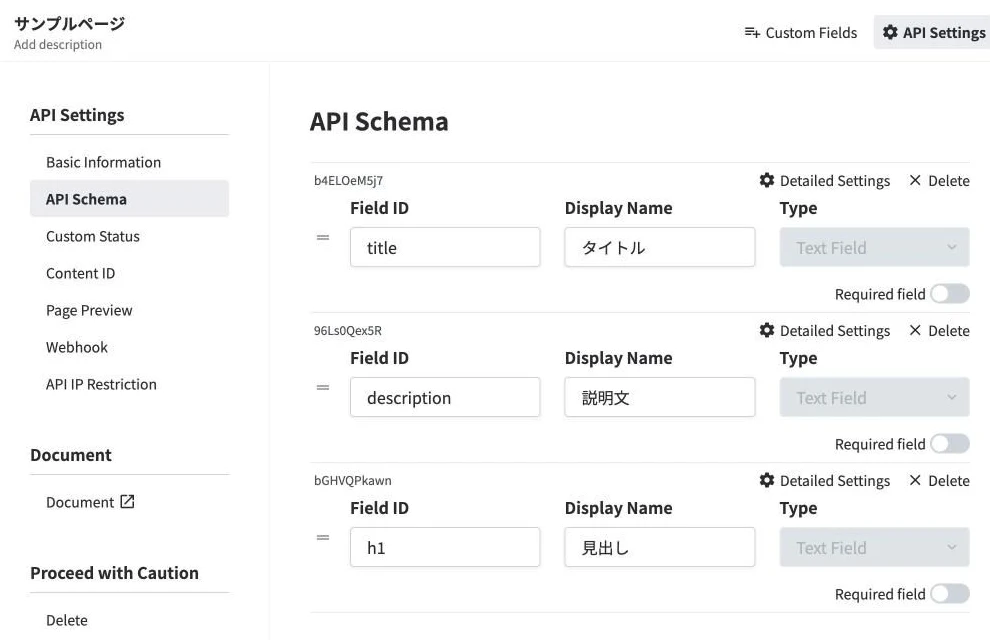
- Click “API Schema” on the left.
- The values in the “Field ID” column are the field IDs you enter in the dashboard. Note the IDs of the fields you use for the title, description and heading.
Choose fields that hold plain text, such as text fields. Get1pct changes a field only when its value exactly matches the text on the live page, so it never changes a field that contains HTML.
Step 6Check what {slug} in your URLs stands for
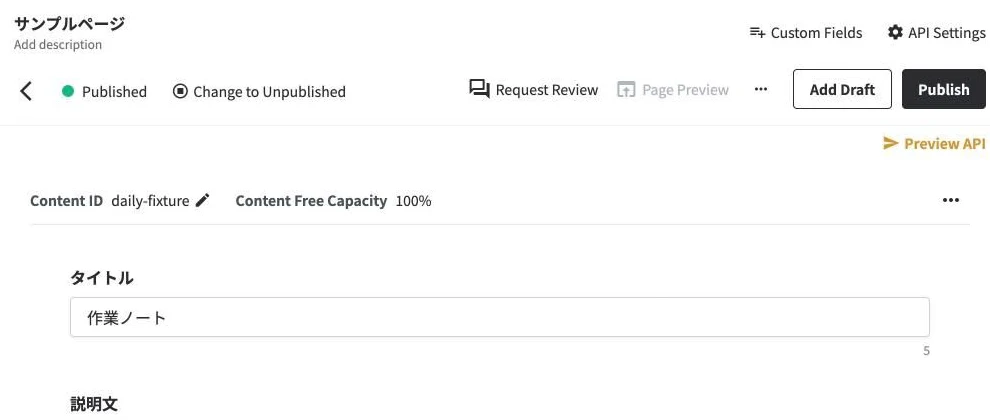
- Open a content item and its “Content ID” is shown at the top. If your page URLs use the content ID, leave “Field ID to match {slug}” blank in the dashboard.
If another field makes up your page URLs, such as slug, enter that field’s ID in “Field ID to match {slug}”. For a page that comes from one fixed content item, such as the home page, leave {slug} out of the path and enter the content ID instead.
Step 7Enter it in the dashboard and click Connect
Open Connections in your dashboard. Under “How your site is updated”, choose “Shopify, Webflow, Contentful, microCMS or another service”. The dashboard in the screenshot is in Japanese, so each step below it gives the English label in brackets.
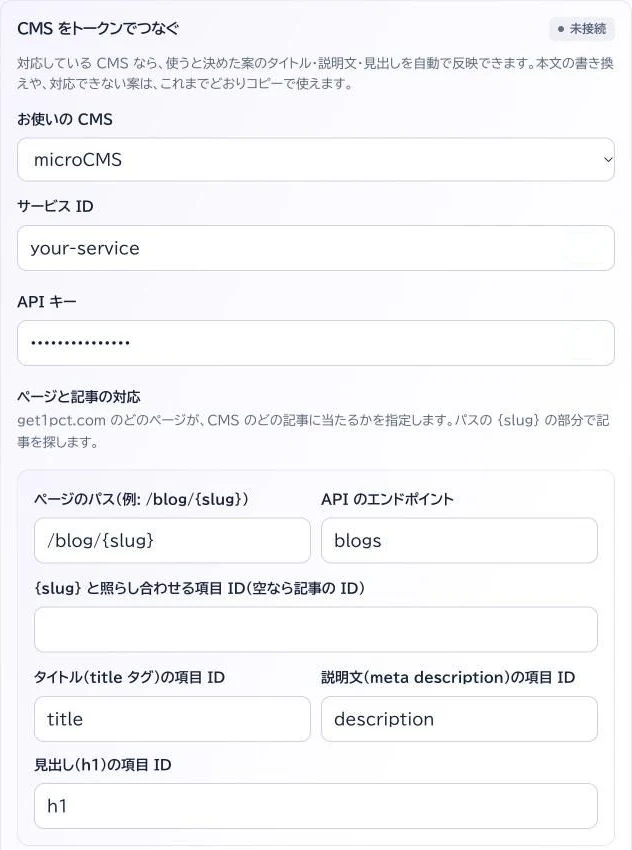
- Choose “microCMS” in “お使いの CMS” (Your CMS).
- Enter the service ID in “サービス ID” (Service ID).
- Paste the key into “API キー” (API key).
- Enter the page path pattern, such as /blog/{slug}, in “ページのパス” (Page path), and the endpoint in “API のエンドポイント” (API endpoint).
- Leave “{slug} と照らし合わせる項目 ID” (Field ID to match {slug}) blank if {slug} is the content ID; otherwise enter that field’s ID, such as slug.
- Enter the IDs of the fields we may change. Edit types left blank are never changed automatically.
To connect more APIs, add rows with “Add a mapping” (up to 10). Then click “Connect” at the bottom.
When you connect, Get1pct checks that the key can read the endpoints you listed and that it has PATCH. If PATCH is missing, you see “This API key has no write permission” right away. If a field you listed isn’t found in your content, Get1pct still connects and shows a note asking you to check the field ID. If the field is just empty, you can ignore the note.
How this connection behaves
Get1pct follows these rules every time it applies an edit through this connection.
- We only change the title tag, meta description and heading (h1), and only in the fields you listed when connecting. We never change body text.
- We change a field only when its current value is exactly the same as the edit’s “before” text (the text on the live page). If it differs at all, it’s a different entry or your site adds words (such as “| Site name”), so we leave it for you to copy.
- We don’t write an edit whose new text is the same as before, longer than 2,000 characters, or contains < > [ ] or control characters (a CMS may read them as tags or shortcodes).
- Before writing we record which field changes from what to what, and after writing we read it back. If the saved value differs, we put the old value back and report a failure.
- If a write is interrupted, we read the current value next time: if it was written we’re done, if it’s unchanged we continue, otherwise we report a failure. We never write the same change twice.
- Undo puts the old value back only while the field still holds the value Get1pct wrote. If someone has edited it since, we leave it.
- We only call the CMS’s official API host. We don’t follow redirects, give up after 15 seconds and don’t read responses over 2 MB.
- Get1pct uses only content that has been published at least once, and never reads drafts. It sends PATCH without a status, so the published content changes in place. It never writes reserved fields such as id and createdAt.
- Both list-type APIs and object-type APIs (a single item with no content ID) work. For an object-type API, map a page path without {slug} and leave the content ID blank. For an object-type API, write access is checked on the first edit, not when you connect.
To compare Shopify, Webflow, Contentful and microCMS side by side, see what each CMS connection can do.
Check the connection
Once connected, use “Check the connection” under the CMS in Connections. Enter the URL of one live article or item page.
- Read test: we find the CMS entry and show, for the title, description and heading, whether the CMS value is exactly the text on the live page. Only those fields are updated automatically; for the others the table shows why. Nothing is changed.
- Write test: we write the current value of one field that can be updated back into it as is, and read it back. The live page doesn’t change. If the token can’t write, or your CMS changes the text when saving, the result says so.
Run the read test first, then the write test. If the write test says the next edit can’t be applied, publish the site (or entry) in your CMS and let us know.
After connecting
- Get1pct writes an edit you choose to microCMS only when the field’s current value exactly matches the text on the live page.
- Get1pct changes the published content in place. If the content also has a draft, only the published version changes. If that draft is published later, the draft’s text replaces the text Get1pct wrote. So if you use an edit on content with a draft in progress, put the same text in the draft before you publish it. To reverse an applied edit, click “Undo the change” on that edit in the dashboard.
- You copy and apply these edits yourself: edits for content that has never been published, edit types whose field ID you left blank, and body text edits.
- If your site is statically generated, the change appears on the live page after your next build.
Troubleshooting
- “We could not connect.”
- Check the service ID (the xxx in xxx.microcms.io), the endpoint and the key, and that the key has GET on that endpoint. For pages without {slug}, check the content ID too.
- Applying an edit fails
- Check that the key has PATCH on that API. If the key was deleted or lost its access, Connections shows “Reconnect needed”. Edits also fail when you hit the microCMS rate limit (5 writes per second), so try again a little later.
- An edit isn’t applied automatically
- To be safe, Get1pct doesn’t change a field whose value differs from the text on the live page (for example, when your site adds words to it). The edit screen shows how each edit will be applied.
To stop
Click “Disconnect” under Connections in your dashboard. Get1pct deletes the API key it stored. The key still exists in microCMS, so also open the key you made for Get1pct in the API key list and delete it.
- Open the key you made for Get1pct in the API key list and click “Delete” at the top right. The key stops working.
Guides for other CMSs: Shopify, Webflow and Contentful.
If the steps don’t match what you see, contact us with your site URL and the screen where you got stuck. Please don’t send passwords.